微信小程序开发
开发前准备
新建项目
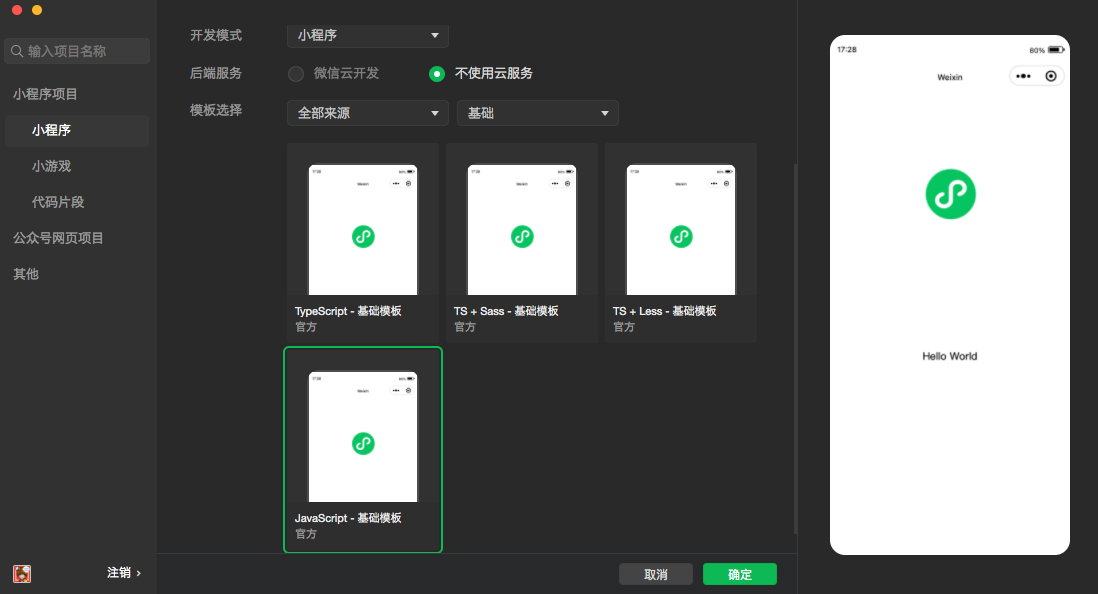
通过开发者工具可以快速新建项目,一般选择官方基础模版即可

会自动生成目录
├── app.js
├── app.json
├── app.wxss
├── pages
│   ├── index
│   │   ├── index.js
│   │   ├── index.json
│   │   ├── index.wxml
│   │   └── index.wxss
│   └── logs
│       ├── logs.js
│       ├── logs.json
│       ├── logs.wxml
│       └── logs.wxss
├── project.config.json
├── sitemap.json
└── utils
└── util.js配置小程序
新建页面
微信给了2个页面的示例,可以在pages目录上右键-[新建文件夹],然后再新的文件夹上右键-[新建Page],软件自动把页面的4个文件生成,而且会在app.json中自动添加新的页面,直接按需修改新生成的4个文件即可
- index.js js方法 事件系统
- index.json 页面配置,使用组件,开启下拉刷新,上拉加载更多等
- index.wxml 比较像html结构,但标签使用微信自有的一套,就是那么自信wxml
- index.wxss css的兄弟,这个还是近亲关系,基本都能复用wxss
{
  "usingComponents": {
    "wemark": "/wemark/wemark"
  },
  "enablePullDownRefresh": true,
  "navigationBarTitleText": "页面标题"
}开放接口
- 登录 wx.login
- 获取用户信息 wx.getUserProfile
获取用户信息
页面产生点击事件(例如 button 上 bindtap 的回调中)后才可调用,每次请求都会弹出授权窗口,用户同意后返回 userInfo。该接口用于替换 wx.getUserInfo,详见 用户信息接口调整说明。
使用插件
好用的工具用起来,比如腾讯的地图、语音转译,专业且免费
在使用插件前,首先要在小程序管理后台的“设置-第三方服务-插件管理”中添加插件

语音转译
使用【微信同声传译插件】插件直接一条龙
app.json
{
  "plugins": {
    "WechatSI": {
      "version": "0.3.5",
      "provider": "wx069ba97219f66d99"
    }
  }
}在需要使用的页面js下加载插件
index.js
const plugin = requirePlugin("WechatSI")
let manager = plugin.getRecordRecognitionManager()

Page({
  data: {
    content: '', // 语音转译结果
  },
  // 页面首次加载,设置插件事件
  onLoad: function (options) {
    manager.onStop = (res) => {
      this.setData({
        content: res.result,
      })
    }
    manager.onStart = (res) => {
      wx.showModal({
        title: '提示',
        content: '开始录音',
        showCancel: false,
        confirmText: '结束录音',
        success: (res) => {
          this.stopRecordToText()
        }
      })
    }
  },
  // 录音并转文字
  startRecordToText: function () {
    manager.start()
  },
  // 停止录音
  stopRecordToText: function () {
    manager.stop()
  },
})index.wxml
<view bindtap="startRecordToText">语音识别</view>自定义组件
创建自定义组件
新建文件夹后,右键可选择新建组件,会自动生成 json wxml wxss js 4个文件
基本语法和页面差不多,但组件默认不会加载css,可在js文件中增加配置
Component({
  options: {
    addGlobalClass: true,
  },
})参数传递,和vue中的props类似,在js中定义
Component({
  properties: {
    // 这里定义了innerText属性,属性值可以在组件使用时指定
    innerText: {
      type: String,
      value: 'default value',
    }
  },
})使用自定义组件
修改页面的json文件
{
  "usingComponents": {
    "component-tag-name": "path/to/the/custom/component"
  }
}页面wxml中使用
<view>
  <!-- 以下是对一个自定义组件的引用 -->
  <component-tag-name inner-text="Some text"></component-tag-name>
</view>API
基础
- 获取设备基础信息 wx.getDeviceInfo
- 获取当前帐号信息(可以获取线上小程序版本号) wx.getAccountInfoSync
路由
- 保留当前页面,跳转到应用内的某个页面 wx.navigateTo
- 关闭当前页面,跳转到应用内的某个页面 wx.redirectTo
- 关闭当前页面,返回上一页面或多级页面 wx.navigateBack
界面
TIP
wx.showLoading 和 wx.showToast 同时只能显示一个 wx.showToast 应与 wx.hideToast 配对使用
- 显示消息提示框 wx.showToast
- 显示模态对话框 wx.showModal
- 显示 loading 提示框 wx.showLoading
网络
需要先根据官方说明做域名配置,网络使用说明
- 请求网络 wx.request
- 上传文件 wx.uploadFile
- 下载文件 wx.downloadFile
数据缓存
同步方法好用哟,和localStorage差不多啦,有类型和大小的限制
- 设置缓存 wx.setStorageSync
- 读取缓存 wx.getStorageSync
- 移除缓存 wx.removeStorageSync
- 清空缓存 wx.clearStorageSync
- 获取缓存信息 wx.getStorageInfoSync
媒体
- 地图看起来好复杂,强烈建议直接使用插件,免费好用接入方便
图片、视频
TIP
不知道为什么iOS15.3上的微信使用wx.chooseMedia选择图片后设置了sizeType为['compressed']后图片未压缩,之前使用wx.chooseImage(API不维护了)还是压缩的,只能再加上wx.compressImage来手动压缩。
- 选择图片、视频 wx.chooseMedia
- 压缩图片 wx.compressImage
// 选择图片
wx.chooseMedia({
  count: 1,
  sizeType: ['compressed'],
  mediaType: ['image'],
  success: (res) => {
    const {
      tempFiles: [
        {
          size,
          tempFilePath: src
        },
      ],
    } = res
    if (size > 5120000) {
      wx.showToast({
        title: '请选择小于5M的图片',
        icon: 'error'
      })
      return
    }
    wx.compressImage({
      src, // 图片路径
      quality: 80 // 压缩质量
    }).then(res => {
      // 上传图片
      console.log(res.tempFilePath)
    })
  },
  fail: () => {
    wx.showToast({
      title: '图片读取失败',
      icon: 'error',
    })
  }
})录音
最多1分钟,超出自动停止
- 开始录音 wx.startRecord
- 结束录音 wx.stopRecord
- 录音管理器 wx.getRecorderManager
WeUI组件库
这是一套基于样式库weui-wxss (opens new window)开发的小程序扩展组件库,同微信原生视觉体验一致的UI组件库,由微信官方设计团队和小程序团队为微信小程序量身设计,令用户的使用感知更加统一。
建议下载代码直接在开发工具中运行体验
引入组件
【强烈推荐】通过 useExtendedLib 扩展库 的方式引入,这种方式引入的组件将不会计入代码包大小。
{
  "useExtendedLib": {
    "weui": true
  },
}使用组件
首先在页面的 json 文件加入 usingComponents 配置字段
{
  "usingComponents": {
    "mp-dialog": "weui-miniprogram/dialog/dialog"
  }
}在wxml文件中加入代码
<button class="weui-btn" type="default" bindtap="openConfirm">确认取消按钮</button>

<mp-dialog title="test" show="{{dialogShow}}" bindbuttontap="tapDialogButton" buttons="{{buttons}}">
  <view>test content</view>
</mp-dialog>在js文件中定义方法
Page({
  data: {
    dialogShow: false,
    buttons: [{
      text: '取消'
    }, {
      text: '确定'
    }],
  },
  openConfirm: function () {
    this.setData({
      dialogShow: true
    })
  },
  tapDialogButton: function () {
    this.setData({
      dialogShow: false,
    })
  },
})云服务
开发小帖士
全局变量
在app.js里定义的变量,可作为全部变量
this.globalData = {
  title: 'test'
}在页面page中使用
const app = getApp()
const title = app.globalData.title换行
小程序不支持<br>,text标签支持/n
<text>1\n 2 abc \n3</text>页面解析效果
1
2 abc
3图片
建议在app.js同层建立images目录,图片直接放目录内
页面内加载图片
<image src="/images/xxx.jpg"></image>